Tables

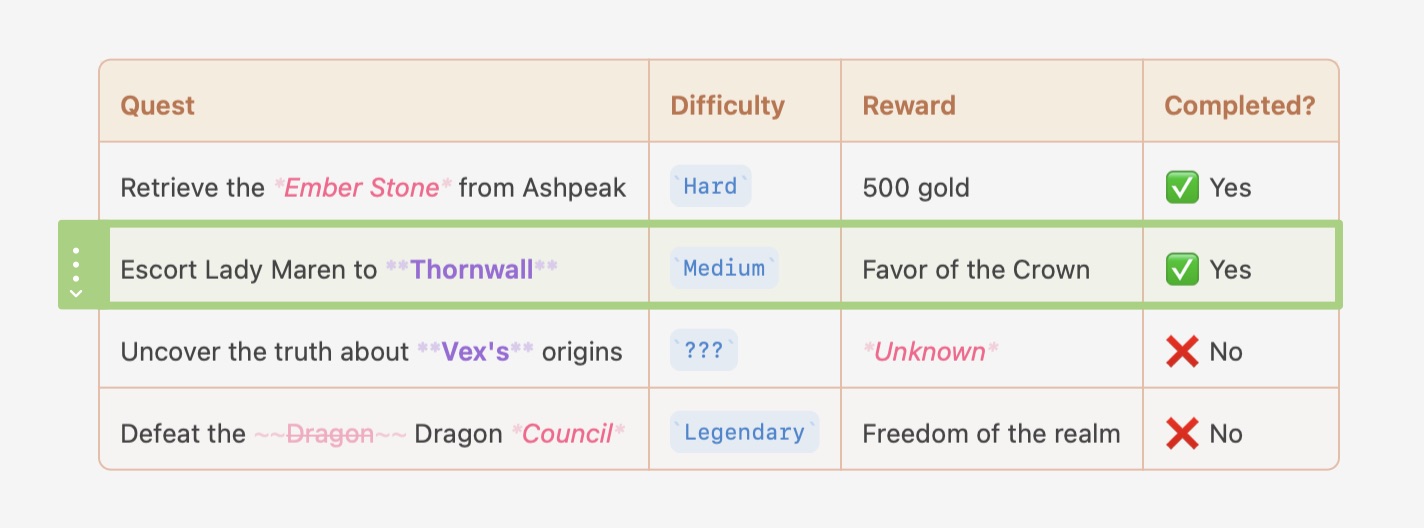
A sample of a table in Atlas
Tables in Atlas are live and interactive. Insert a table and it renders immediately, with handles for managing rows and columns right inside the document. Tables work in text documents on iPhone, iPad, and Mac.
Inserting a Table

Table options in the main menu bar
Three ways to insert a table:
- iOS/iPadOS: Tap the table button in the formatting keyboard
- Mac: Click the table button in the floating formatting bar
- Both platforms: Markup menu → Table → Insert Table
Every new table starts with 2 columns, a header row, and one body row — the first cell is immediately ready to type. "Insert Table" is only available when the cursor is outside an existing table.
Deleting a Table
With focus anywhere inside the table:
- iOS: Formatting keyboard (table mode) → Delete Table
- Mac: Table operations dropdown in the formatting bar → Delete Table
- Both: Markup menu → Table → Delete Table
- Keyboard safeguard: With the cursor just after the table, pressing Delete once selects the table; pressing Delete again removes it — preventing accidental loss from stray keystrokes
All deletions are undoable. Cmd+Z restores the table with all its content intact.
Working with Cell Content
Tap (iOS) or click (Mac) any cell to start writing. Cells support the full set of inline markdown formatting, plus a few extras:
- Bold, italic, strikethrough, inline code
- Links, images, equations
- Annotations and footnotes
Block-level constructs — code fences, blockquotes, headings — aren't supported inside cells.
All inline formatting controls stay available while you're in a cell: the formatting keyboard on iOS and the floating formatting bar on Mac. Apply formatting by selecting text and tapping/clicking the control, using a keyboard shortcut, or choosing from the Markup menu.
To insert a line break within a cell without moving to the next row, press Option+Return on either platform. The cell expands to fit the extra line.
Navigating Between Cells
| Action | Key |
|---|---|
| Next cell | Tab |
| Previous cell | Shift+Tab |
| Cell below | Enter |
| Exit table | Esc |
| Line break within cell | Option+Enter |
Tip
Pressing Tab or Enter in the last cell of the last row automatically appends a new row.
Pressing Esc commits the current cell and returns focus to the document just after the table. Clicking or tapping outside the table does the same.
Working with Rows and Columns
A selected table row
When focus is inside a table, three-dot handles appear along the left edge (one per row) and the top edge (one per column).
Selecting a row or column — Tap or click a handle to highlight the entire row or column. Shift+tap / Shift+click a second handle extends the selection — rows with rows, columns with columns.
Tip
On macOS or an iPad with a connected keyboard, hold Shift and tap a cell to select it directly and not the contents. Hold Shift and tap another cell again to extend the selection.
Opening the context menu:
- iOS: Second tap on an already-selected handle
- Mac: Click the chevron that appears on a selected handle
Row handle menu: Copy (with format options), Cut, Add Row Above, Add Row Below, Delete Row
Column handle menu: Column Alignment submenu, Copy (with format options), Cut, Add Column Before, Add Column After, Delete Column
The same operations are available without using handles:
- iOS: The formatting keyboard switches to table mode showing Add Row Above/Below, Add Column Left/Right, Delete Row, Delete Column, and Delete Table buttons
- Mac: The floating formatting bar shows a table operations dropdown with the same set of actions
- Both: Markup menu → Table submenu
All structural changes are undoable as a single action, including multi-row and multi-column deletions.
Copying Tables in Different Formats
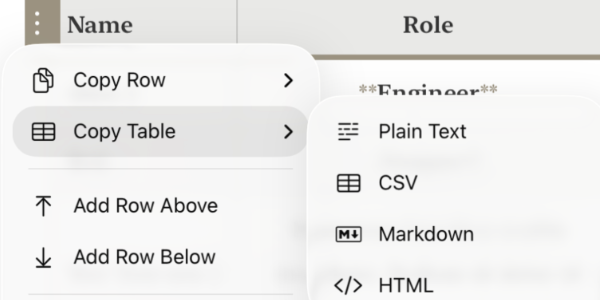
The Table Context Menu on iOS showing the copy formats
The handle menu can copy the table — or just the selected rows or columns — in whichever format you need:
- Copy Table — copies the entire table
- Copy Row(s) / Copy Column(s) — copies your current handle selection
Each offers four formats:
| Format | Best for |
|---|---|
| Plain Text | Pasting into a spreadsheet (Numbers, Excel, Sheets) as tab-separated columns |
| CSV | Data tools and imports — comma-separated, with fields quoted when needed |
| Markdown | Pasting into another Markdown document; inline formatting is preserved |
| HTML | Pasting into rich-text editors and email as a real table |
Note
CSV copies every selected row as-is — if your selection includes the header row, it becomes the first line. There's no separate "with/without header" option.
Column Alignment
Each column has an independent alignment that applies to all of its cells, including the header.
Alignment options: Left, Center, Right, or Default (no explicit alignment). Set alignment via the Column Alignment submenu in the column handle context menu, the alignment controls in the formatting bar or keyboard, or Markup menu → Table → Column Alignment. When pasting a GFM table that includes alignment delimiters, those alignments are automatically preserved.
Pasting and Importing Tables
Paste any of the following and Atlas converts it automatically — no special paste command needed:
HTML tables — from web pages, Word, Pages, Notion, or rich-text email. Inline formatting (bold, italic, code, links) is preserved. Column alignment is extracted from align attributes, inline text-align styles, and <colgroup> hints, so tables from web pages and spreadsheets keep their alignment far more reliably. HTML entities are decoded.
Tab-separated values (TSV) — copy a range of cells from Numbers, Excel, or Google Sheets and paste directly. The first row becomes the header.
GFM markdown — any GitHub Flavored Markdown table with or without leading/trailing pipes; ragged columns are handled gracefully.
If the clipboard content isn't recognized as a table, paste falls through to normal behavior. The entire paste operation is a single undo action.
Tip
To bring in a spreadsheet table, simply copy the cells in Numbers or Excel and paste — Atlas detects the tab-separated format automatically.
Exporting Tables
Tables export faithfully across all formats:
- Markdown — GFM wire format. Column alignment, cell content, and soft line breaks round-trip with full fidelity.
- HTML — Semantic
<table>with<thead>,<tbody>,<th scope="col">, and<td>. Column alignment written as inlinetext-alignstyles. Styled by the chosen HTML export style — all three built-in HTML styles include table-specific CSS targeting headers, borders, and row backgrounds. - ePub — Same HTML structure with
page-break-inside: avoidapplied to rows so a single row is never split across two ebook pages. - PDF — Participates in the PDF rendering pipeline with dedicated per-style table settings: border color and weight, cell padding, header background and text, and optional alternate row tinting. Tables render as an atomic block — a table taller than the remaining page begins on the next page and appears in full.
See Custom Export Styles and PDF Style Reference for more on styling.
Table Colors in the Theme Editor
The Theme Editor gives you independent control over how tables look while writing. Select the Table element in the Style Panel to reveal six color controls:
- Border — Grid lines between cells
- Header Background — Fill behind the header row (clearable)
- Header Text — Text color in the header row
- Row Background — Fill behind body rows (clearable)
- Alternate Row Background — Fill for every other body row, creating a striped appearance; clearing this control disables row alternation entirely (clearable)
- Selected Cell — Highlight behind the currently focused cell (clearable)
All table colors are per-appearance — light and dark edit independently. See The Theme Editor for a full overview.
See Also
- Writing with Markdown — Inline formatting that works inside table cells
- Custom Export Styles — HTML, ePub, and PDF style options for table rendering
- The Theme Editor — Customize table colors in the editor
- Keyboard Shortcuts — Full shortcut reference